Part 3: Trigger actions from chatbots using Power Virtual Agents
Harshani Perera, 18 November 2020
In Part 1 and Part 2 of this blog series, I showed you how to create a bot and request information from the user. In the last part of this series, I will show you how to take this information and trigger an action to email the Customer Services team.
Trigger Action
1. Click the + Sign on the Message > Select Call an action > Click Create a Flow
You will see a screen with inputs and outputs. Inputs are information taken from the chatbot and outputs are information you want to return to the user e.g. retrieve and provide the information to the user.
2. Add the inputs which is the information the bot took from the user i.e. name, phone number and the type of training.
Click + Add an input > Select Text> Type in Name
3. Click the + Add an input and select Number to enter the Phone.
4. Click the + Add an input and select Text to enter Training.
5. Click the + sign to create a Flow to send the email > select ‘Add an action’
6. Select Mail.
7. Select ‘Send an email notification’ and Accept.
8. Fill the To field with the email you want to send the email.
9. Add a subject. I will add the name of the person who requested in the Subject line. Click add dynamic content and select Name. If you don’t see the dynamic content you want, type it in the Search box and it will show up.
10. Complete the body of the email with the information you want to send to the Customer Service team so that they can contact the person.
11. Rename the Flow so that it is more meaningful. Select the name to highlight it and type in the new name e.g. Training request email. Click Save.
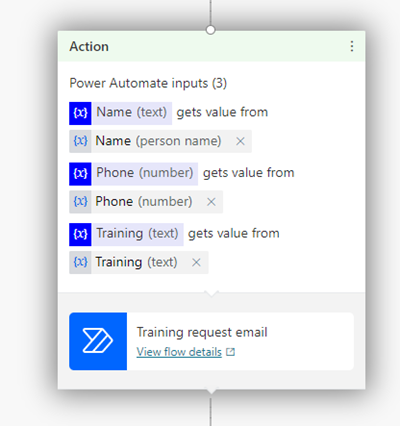
12. Now go back to the Power Virtual agent and add this action you just created. Click the + sign > select Call an action > Select Training request email.
13. Now match the variables in Power Automate with the variables input by the user. i.e. The Name on the email will be the name entered by the user etc. Once completed, click Save.
14. Display a message to inform the user that their request has been forwarded to the team such as below.
End the Conversation
15. Finish the topic by selecting End the conversation and to End with survey. Click Save.
Test your bot
1. Click ‘Test your bot’ on the bottom left navigation and enter a message in the chat e.g. I want to book a session with a personal trainer
I received the following email to my mailbox with the request.
Publish the Bot
If you are happy with the bot, click the Publish button on the left navigation and click Publish.
Share your Bot
Once published, you can ask others to try out your bot by sharing the URL of the demo website.
And that’s it! As you can see, it is easy and quick to trigger actions from the chatbot without using any code. This blog shows how to trigger emails however it can do much more such as send notifications to teams, retrieve information from systems etc.


