Add Reply Button onto Custom Activity in Dynamic CRM 2011
Zhen Yuwang, 11 August 2012
In this blog, I would like to discuss how to add a “Reply” button onto a Custom Activity “Contact Us” in Dynamic CRM 2011.
That button should have similar behaviours with the “Reply” button in Email Activity.
Assume our “Contact Us” entity looks like this:

First of all, we need to export a solution with this activity and its application ribbon. Extract it and open the “customizations.xml” file in a XML editor, such as Visual Studio 2010. Find Out the “RibbonDiffXml” part of entity “mag_contactus”. Add 2 “CustomAction” and 1 “CommandDefinition” like this:
<CustomActions> <CustomAction Id="Mag.ZhenyuDev.mag_contactus.Form.ReplyGroup.CustomAction" Location="Mscrm.Form.mag_contactus.MainTab.Groups._children" Sequence="1"> <CommandUIDefinition> <Group Id="Mag.ZhenyuDev.mag_contactus.Form.ReplyGroup" Command="Mscrm.Enabled" Sequence="1" Title="$Resources:Ribbon.Form.email.RespondTitle" Image32by32Popup="/_imgs/ribbon/replymail_32.png" Template="Mscrm.Templates.Flexible2"> <Controls Id="Mag.ZhenyuDev.mag_contactus.MainTab.Respond.Controls"> <Button Id="Mag.ZhenyuDev.mag_contactus.Reply" Command="Mag.ZhenyuDev.mag_contactus.Reply" Sequence="10" Alt="$Resources:Ribbon.Form.email.MainTab.Actions.Reply" LabelText="$Resources:Ribbon.Form.email.MainTab.Actions.Reply" Image16by16="/_imgs/ribbon/replymail_16.png" Image32by32="/_imgs/ribbon/replymail_32.png" TemplateAlias="o1" ToolTipTitle="$Resources:Mscrm_Form_email_MainTab_Actions_Reply_ToolTipTitle" ToolTipDescription="$Resources:Mscrm_Form_email_MainTab_Actions_Reply_ToolTipDescription" /> </Controls> </Group> </CommandUIDefinition> </CustomAction> <CustomAction Id="Mag.ZhenyuDev.mag_contactus.Form.ReplyGroup.MaxSize.CustomAction" Location="Mscrm.Form.mag_contactus.MainTab.Scaling._children" Sequence="1"> <CommandUIDefinition> <MaxSize Id="Mag.ZhenyuDev.mag_contactus.Form.ReplyGroup.MaxSize" GroupId="Mag.ZhenyuDev.mag_contactus.Form.ReplyGroup" Sequence="1" Size="LargeMedium" /> </CommandUIDefinition> </CustomAction> </CustomActions> <CommandDefinitions> <CommandDefinition Id="Mag.ZhenyuDev.mag_contactus.Reply"> <EnableRules /> <DisplayRules /> <Actions> <JavaScriptFunction FunctionName="ZhenyuDev.reply" Library="$webresource:mag_/js/zhenyudev.ribbon.js"> <CrmParameter Value="PrimaryEntityTypeCode" /> <CrmParameter Value="FirstPrimaryItemId" /> </JavaScriptFunction> </Actions> </CommandDefinition>
<CustomActions> <CustomAction Id="Mag.ZhenyuDev.mag_contactus.Form.ReplyGroup.CustomAction" Location="Mscrm.Form.mag_contactus.MainTab.Groups._children" Sequence="1"> <CommandUIDefinition> <Group Id="Mag.ZhenyuDev.mag_contactus.Form.ReplyGroup" Command="Mscrm.Enabled" Sequence="1" Title="$Resources:Ribbon.Form.email.RespondTitle" Image32by32Popup="/_imgs/ribbon/replymail_32.png" Template="Mscrm.Templates.Flexible2"> <Controls Id="Mag.ZhenyuDev.mag_contactus.MainTab.Respond.Controls"> <Button Id="Mag.ZhenyuDev.mag_contactus.Reply" Command="Mag.ZhenyuDev.mag_contactus.Reply" Sequence="10" Alt="$Resources:Ribbon.Form.email.MainTab.Actions.Reply" LabelText="$Resources:Ribbon.Form.email.MainTab.Actions.Reply" Image16by16="/_imgs/ribbon/replymail_16.png" Image32by32="/_imgs/ribbon/replymail_32.png" TemplateAlias="o1" ToolTipTitle="$Resources:Mscrm_Form_email_MainTab_Actions_Reply_ToolTipTitle" ToolTipDescription="$Resources:Mscrm_Form_email_MainTab_Actions_Reply_ToolTipDescription" /> </Controls> </Group> </CommandUIDefinition> </CustomAction> <CustomAction Id="Mag.ZhenyuDev.mag_contactus.Form.ReplyGroup.MaxSize.CustomAction" Location="Mscrm.Form.mag_contactus.MainTab.Scaling._children" Sequence="1"> <CommandUIDefinition> <MaxSize Id="Mag.ZhenyuDev.mag_contactus.Form.ReplyGroup.MaxSize" GroupId="Mag.ZhenyuDev.mag_contactus.Form.ReplyGroup" Sequence="1" Size="LargeMedium" /> </CommandUIDefinition> </CustomAction></CustomActions><CommandDefinitions> <CommandDefinition Id="Mag.ZhenyuDev.mag_contactus.Reply"> <EnableRules /> <DisplayRules /> <Actions> <JavaScriptFunction FunctionName="ZhenyuDev.reply" Library="$webresource:mag_/js/zhenyudev.ribbon.js"> <CrmParameter Value="PrimaryEntityTypeCode" /> <CrmParameter Value="FirstPrimaryItemId" /> </JavaScriptFunction> </Actions> </CommandDefinition>These xml codes add a new group and a new button into “Contact Us” Ribbon. Fire the JavaScript when clicking.
Save xml file and compress back to a .zip file. Import back and publish. That button should appear in the ribbon.

Then Create a JavaScript with name “/js/zhenyudev.ribbon.js”. Add it into form libraries of “Contact Us” Activities. It will open a new window for Email Activity with all parameters needed. Code snippet is here:
ZhenyuDev.reply = function (contactUsEtc, contactUsId) { // Gets the current Users Server URL var serverUrl = ZhenyuDev.getServerUrl(); //remove curly braces from the id contactUsId = contactUsId.replace("{", ""); contactUsId = contactUsId.replace("}", ""); var params, code; var customer = Xrm.Page.getAttribute("mag_customerid").getValue(); if (customer != null) { var cid = customer[0].id; //remove curly braces from the id cid = cid.replace("{", ""); cid = cid.replace("}", ""); // Set "To" field in Email params = "%26partyid%3d%257b" + cid; params += "%257d%26partyname%3d"; // Get Entity Type Code by name code = ZhenyuDev.GetObjectTypeCode(customer[0].entityType) params += "%26partytype%3d" + code; } var urlToPop = serverUrl + "/main.aspx?etn=email&extraqs=%3f_CreateFromId%3d%257b" + contactUsId + "%257d%26_CreateFromType%3d" + contactUsEtc + "%26etn%3dmag_contactus" + params + "&pagetype=entityrecord"; window.open(urlToPop); }
ZhenyuDev.reply = function (contactUsEtc, contactUsId) { // Gets the current Users Server URL var serverUrl = ZhenyuDev.getServerUrl(); //remove curly braces from the id contactUsId = contactUsId.replace("{", ""); contactUsId = contactUsId.replace("}", ""); var params, code; var customer = Xrm.Page.getAttribute("mag_customerid").getValue(); if (customer != null) { var cid = customer[0].id; //remove curly braces from the id cid = cid.replace("{", ""); cid = cid.replace("}", ""); // Set "To" field in Email params = "%26partyid%3d%257b" + cid; params += "%257d%26partyname%3d"; // Get Entity Type Code by name code = ZhenyuDev.GetObjectTypeCode(customer[0].entityType) params += "%26partytype%3d" + code; } var urlToPop = serverUrl + "/main.aspx?etn=email&extraqs=%3f_CreateFromId%3d%257b" + contactUsId + "%257d%26_CreateFromType%3d" + contactUsEtc + "%26etn%3dmag_contactus" + params + "&pagetype=entityrecord"; window.open(urlToPop);}Because the subject and description field of Email are slightly different from “Contact Us” Activity. We need another method and put it onLoad Event of Email Activity.
Moreover, several hidden fields are put onto Email form and mapped in the relationship between Email and Contact Us.
Those hidden fields will be prefill by parameter in Url and by mapping. Then “ZhenyuDev.prefillEmailFields” will get all those value and restructure the description of Email.
// Prefill subject and description fields, if this email is created from Contact Us ZhenyuDev.prefillEmailFields = function () { var contactUs = Xrm.Page.getAttribute("mag_contactusid").getValue(); var isCreateForm = Xrm.Page.ui.getFormType() == 1; if (contactUs != null && isCreateForm) { // get value for subject field var subject = Xrm.Page.getAttribute("subject").getValue(); if (subject == null) { subject = ""; } // get values for description field var contactUsFrom = "", contactUsReceived = "", contactUsMessage = "", contactUsTo = ""; var emailTo = Xrm.Page.getAttribute("to").getValue(); if (emailTo != null) { contactUsFrom = emailTo[0].name; } var emailFrom = Xrm.Page.getAttribute("from").getValue(); if (emailFrom != null) { contactUsTo = emailFrom[0].name; } contactUsReceived = Xrm.Page.getAttribute("mag_contactusreceived").getValue(); contactUsReceived = contactUsReceived.format("M/dd/yyyy h:mm tt"); var emailMessage = Xrm.Page.getAttribute("mag_message").getValue(); if (emailMessage != null) { contactUsMessage = emailMessage; } // set up subject filed Xrm.Page.getAttribute("subject").setValue("RE: " + subject); // set up description filed var description = "<font face=\"Tahoma, Verdana, Arial\" size=\"2\">"; description += "<br/>"; description += "------------------- Original Message -------------------"; description += "<br/>"; description += "<b>From: </b>" + contactUsFrom; description += "<br/>"; description += "<b>Received: </b>" + contactUsReceived; description += "<br/>"; description += "<b>To: </b>" + contactUsTo; description += "<br/>"; description += "<b>Subject: </b>" + subject; description += "<br/>"; description += "<br/>"; description += contactUsMessage; description += "</font>"; Xrm.Page.getAttribute("description").setValue(description); } }
// Prefill subject and description fields, if this email is created from Contact UsZhenyuDev.prefillEmailFields = function () { var contactUs = Xrm.Page.getAttribute("mag_contactusid").getValue(); var isCreateForm = Xrm.Page.ui.getFormType() == 1; if (contactUs != null && isCreateForm) { // get value for subject field var subject = Xrm.Page.getAttribute("subject").getValue(); if (subject == null) { subject = ""; } // get values for description field var contactUsFrom = "", contactUsReceived = "", contactUsMessage = "", contactUsTo = ""; var emailTo = Xrm.Page.getAttribute("to").getValue(); if (emailTo != null) { contactUsFrom = emailTo[0].name; } var emailFrom = Xrm.Page.getAttribute("from").getValue(); if (emailFrom != null) { contactUsTo = emailFrom[0].name; } contactUsReceived = Xrm.Page.getAttribute("mag_contactusreceived").getValue(); contactUsReceived = contactUsReceived.format("M/dd/yyyy h:mm tt"); var emailMessage = Xrm.Page.getAttribute("mag_message").getValue(); if (emailMessage != null) { contactUsMessage = emailMessage; } // set up subject filed Xrm.Page.getAttribute("subject").setValue("RE: " + subject); // set up description filed var description = "<font face=\"Tahoma, Verdana, Arial\" size=\"2\">"; description += "<br/>"; description += "------------------- Original Message -------------------"; description += "<br/>"; description += "<b>From: </b>" + contactUsFrom; description += "<br/>"; description += "<b>Received: </b>" + contactUsReceived; description += "<br/>"; description += "<b>To: </b>" + contactUsTo; description += "<br/>"; description += "<b>Subject: </b>" + subject; description += "<br/>"; description += "<br/>"; description += contactUsMessage; description += "</font>"; Xrm.Page.getAttribute("description").setValue(description); }}
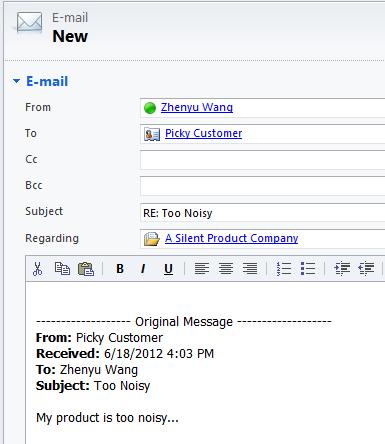
Finally, it works. After clicking our “Reply” button, a new Email will show with these fields in it:
Owner -> From, Customer -> To, Subject -> “RE: ” + Subject, Regarding -> Regarding and a “reply” style Description field.


