

Modifying the Navigation Pane in Dynamics CRM 2011
Zhen Yuwang, 24 December 2011
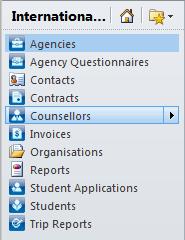
In this post, I will show you how easy it is to modify the navigation pane in Dynamics CRM 2011. Like CRM 4.0, we can simply export an XML definition, make changes, and then import the XML back into the system to make the changes. The requirement for this navigation pane is that no group headings are present.
Firstly, it is recommended that you create a new solution for the Site Map component. Give it a meaningful name and version number.

Click on Save. Under the Components area, select Add Existing and then select Site Map.

We can now click on Export Solution from the solution toolbar. This will download a ZIP file to your computer with a customizations.xml file that you can edit.


<Area Id="area_iams" Title="International Agencies" Icon="$webresource:mag_/img/iams_24x24.gif" ShowGroups="false">
<Group Id="IA_Group">
<SubArea Id="mag_agency" Entity="mag_agency">
<Privilege Entity="mag_tripreport" Privilege="Read" />
</SubArea>
<SubArea Id="mag_agencyquestionnaire" Entity="mag_agencyquestionnaire">
<Privilege Entity="mag_tripreport" Privilege="Read" />
</SubArea>
…
</Group>
</Area>
Notice the structure of the XML definition of the navigation pane. We start with a main Area (e.g. Sales, Marketing, Service), and inside this we can define any number of Groups. The main thing to note in our Area definition is the ShowGroups=”false” parameter. It is important to use meaningful names for the Area, Group, and SubArea Ids.
Lastly, we save the XML file and compress it with the other two downloaded files left unchanged. These can then be reimported into the system. Ensure you publish all customizations.

After the publishing process is complete, press F5 in Internet Explorer to refresh CRM and view changes to the navigation pane.
Category List

Filter by Author
Adam Murchison
Alfwyn Jordan
Arthur Mandisodza
Calum Jacobs
Colin Maitland
David Mochrie
Dominic Liu
Gayan Perera
Harshani Perera
Isaac Stephens
Jaime Smith
Jared Johnson
John Barrencechea
John Eccles
Lauren Withers
Paul Nieuwelaar
Roshan Mehta
Roz Millar
Ryan Blaikie
Ryan Ingram
Sarah Coleman
Sean Roque
Shalane Williams