

Enabling Auditing in Dynamics CRM 2011
Paul Nieuwelaar, 14 June 2011
Auditing is sort of like a running history of changes to a field on a particular entity. What this allows you to do is track any changes made to fields, records, or entities by users in your system. For example if you have Auditing enabled on the Account, and a User updates the Business Phone number, a record of this change will be stored in the Audit History on the record, showing the New Value, the Old Value, and even the Time and Date the change was made, and by which user.
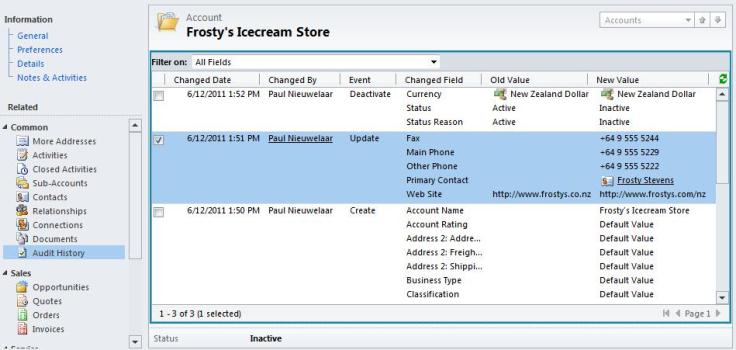
As you can see in the image above, once Auditing has been enabled, each change to the record will keep a history of each field that was changed. You will notice that even when updating multiple fields at once, they will show up under the same Audit record.
For auditing to occur on a field, the field must first be enabled for auditing (which by default it is), then the entity that the field is on must be enabled for auditing, and finally auditing must be enabled for the Organization. All 3 must be enabled before a field will be audited.
Auditing is actually very easy to turn on, in fact almost every field in the system is already enabled for Auditing, all you need to do is turn on auditing at the Entity and Organization Level. Some main entities, such as Accounts, Contacts and Leads are already enabled for auditing, so you will only need to enable Auditing at the Organization level for these.
For other entities that are not enabled for Auditing by default, such as Invoices or Tasks, you will need to open the entity customizations, and turn on the ‘Auditing’ option.

Once your Entities and Fields are set, you can turn on Auditing for the Organization. Only once this has been set will auditing begin.
This can be found in the System Settings under the Administration section of the Settings area. From the system settings you will see a tab labelled ‘Auditing’, which contains several checkboxes allowing you to enable Auditing over different entities.

You will notice the ‘Common Entities’ option is checked by default, and is greyed out. You also have the option to enable auditing over entities located in the different areas of your sitemap, such as Sales and Marketing. If you hover your mouse over the checkboxes you will be able to see which entities these areas apply to.
The final thing to set is the ‘Start Auditing’ checkbox. Once this is set auditing will begin over the selected entities.
You can check that auditing is now working by updating a record in your system, such as an account, and then checking the Audit History on the left of the record. If it is working correctly you should start to see some history of changes to the record.
If you open one of the Audit records you will be able to get a detailed view of the changes made.

From now one whenever a user makes a change to a record, whether this is updating field values, or disabling the record, you will be able to see who made the change, when the change was made, and what was changed.
You can disable auditing at any time at a field, entity, or organization level, and any existing Audit history will not be lost from when it was previously enabled.
Category List

Filter by Author
Adam Murchison
Alfwyn Jordan
Arthur Mandisodza
Calum Jacobs
Colin Maitland
David Mochrie
Dominic Liu
Gayan Perera
Harshani Perera
Isaac Stephens
Jaime Smith
Jared Johnson
John Barrencechea
John Eccles
Lauren Withers
Paul Nieuwelaar
Roshan Mehta
Roz Millar
Ryan Blaikie
Ryan Ingram
Sarah Coleman
Sean Roque
Shalane Williams