

Form Customization in Dynamics CRM 2011 – Part 3
Paul Nieuwelaar, 13 October 2010
In my last blog post on Form customizations, I showed some new features of Dynamics CRM 2011 that would save you time, such as making a field not display on a form by default, deleting fields, sections, and tabs by pressing the delete key, and dragging fields directly onto the form.
Creating new fields from within a form
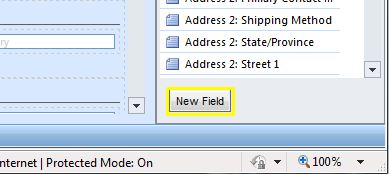
Often when editing a form, I will find that I need to create new fields. In Dynamics CRM 4.0 to do this you would need to go back to the entity, click on Attributes, and then click new. In Dynamics CRM 2011 there is a button on the form when editing it, called ‘New Field’, which when clicked will directly open up the new field window.
More descriptive field types and options
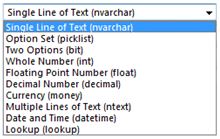
When creating a new field, the ‘Type’ field specifies what type of field you want to create. But, in Dynamics CRM 4.0 sometimes the options weren’t clear to some people, as they might not know the difference between ‘int’ and ‘float’ for example. But in Dynamics CRM 2011, as well as keeping with the old naming conventions of Dynamics CRM 4.0, there is also a more descriptive name for each type, such as ‘Whole Number (int)’ and ‘Floating Point Number (float)’. This way it is easier for people to know exactly what they are getting with a field.
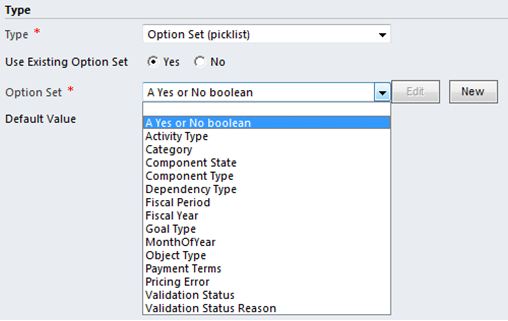
If you chose an Option Set (picklist) you can also choose to use an existing option set, which means that you can create an option set to be used over multiple entities, such as Payment terms, so that you don’t need to create the same option set more than once. Also if you need to create a mapping, you will know that the values will be the same over all entities.
Making a field appear twice on a form
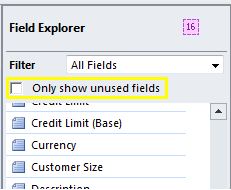
I actually did a blog post on this for Dynamics CRM 4.0 a few months ago, and now it’s a feature of Dynamics CRM 2011! It is actually very easy to do this, say you want the Currency field on both the Administration tab, and the General tab, all you need to do is change the view of fields in the Field Explorer to show every field, by unchecking the ‘Only show unused fields’ checkbox.
You should now be able to see the field that you want to add to the form again. Now just drag it onto the form where ever you want it to be, and when the value of one is changed, the other will be automatically updated as well.
That concludes my three part post on Dynamics CRM 2011 Customizations, however there are still many more cool new features out there around the customizations, so jump in and see what else you can find.
Category List

Filter by Author
Adam Murchison
Alfwyn Jordan
Arthur Mandisodza
Calum Jacobs
Colin Maitland
David Mochrie
Dominic Liu
Gayan Perera
Harshani Perera
Isaac Stephens
Jaime Smith
Jared Johnson
John Barrencechea
John Eccles
Lauren Withers
Paul Nieuwelaar
Roshan Mehta
Roz Millar
Ryan Blaikie
Ryan Ingram
Sarah Coleman
Sean Roque
Shalane Williams