

Installing and Configuring the CRM for Outlook Client
Paul Nieuwelaar, 02 June 2010
If you use Microsoft Dynamics CRM in your business, and you are thinking about installing the CRM for outlook client, this blog will walk you through installing it, and setting it up.
Installing CRM for Office Outlook
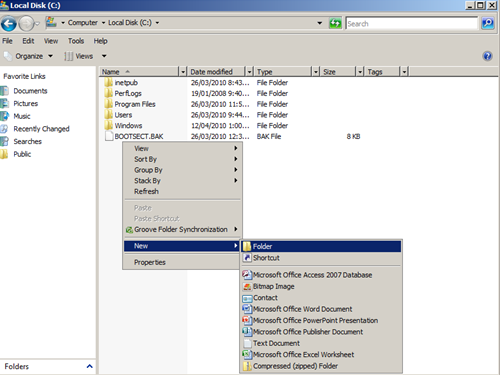
- Create a new folder in the C: Drive. Open Computer and then open Local Disk (C:). Right click inside the window, and select New, and then Folder and name it Outlook Client. This will be where you save the installation files for the CRM for Outlook Client.
- Go to: http://www.microsoft.com/downloads/details.aspx?FamilyID=60c4a6cc-59d7-416e-9f44-0ae8ff249768&displaylang=en and click the Download button.
- Click Run in the dialog box to run the file.
- After the download has completed, click Run again, or click Save if you wish to save the installation file to your computer.
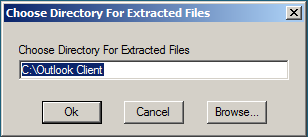
- Once you have run the file, you will be asked to Choose Directory For Extracted Files. By default it is set to desktop, you do not want to extract it to your desktop as there are 15 files that will be extracted.
Click browse, and navigate to the Outlook Client folder you created earlier in the C: Drive, it is under Computer, Local (C:), and then Outlook Client. Click Ok to extract the files to the specified folder.
- Click OK once the extraction completes.
- Go to the Outlook Client folder where the extracted files were saved, under Computer, Local (C:), and open the setupclient.exe file.
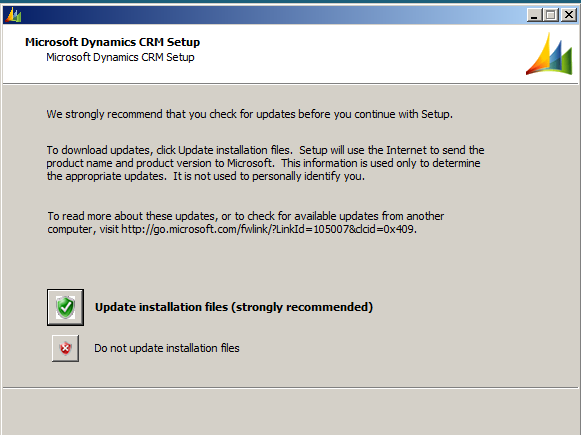
- Click Update Installation Files (Strongly recommended) – this may take a few minutes.
- Once it has finished updating select Install Microsoft Dynamics CRM for Outlook with Offline Access (Advanced) and click Next.
NOTE: This option will allow you to take Outlook offline to make changes to CRM. - Click I accept this licence agreement and then click I Accept.
- CRM for Outlook will now install. Once it finishes installing, click Close.
Configuring CRM for Office Outlook
- Go to the Start Menu, expand All Programs, and click the Microsoft Dynamics CRM 4.0 folder, click and open Configuration Wizard.

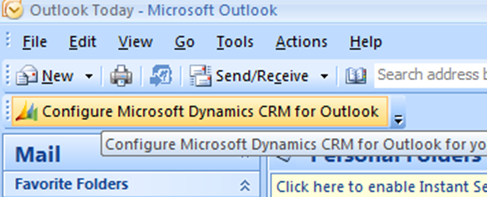
You can also get to the Configuration Wizard by clicking on the Configure Microsoft Dynamics CRM for Outlook button on the Outlook Toolbar.
- Click Next when the Configuration Wizard opens. If your CRM is being hosted, select An online service provider, or if it is in-house select My company. Click Next.
- Enter the Web address of your CRM (the URL you use to access CRM) and click Next.
NOTE: if the web address has https in the name, make sure you replace the default http with the correct web address. - Enter your personal User Name and Password for CRM, make sure Remember my password and connect me automatically is checked and then click OK.
- Click Finish on the Configuration Complete page.
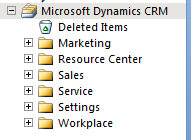
From within Outlook you can now expand the Microsoft Dynamics CRM folder to access CRM functions, and your contacts from CRM will be accessible through Outlook once it has been configured.
It is also recommended that after installing the CRM for Outlook Client you run the Diagnostics function, to make sure everything is running smoothly. Diagnostics can be found in the same location as the Configuration Wizard. Under the Start Menu, expand All Programs, and click the Microsoft Dynamics CRM 4.0 folder, click and open Diagnostics. In the Microsoft Dynamics CRM Diagnostics Window, click Run Diagnostics. When it has finished running click Fix All if there are any issues, and then close the window.
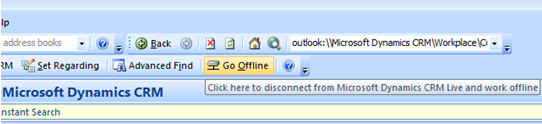
You can also use CRM in offline mode, in case you lose internet connection, or need to use CRM somewhere that doesn’t have internet. You can go offline by clicking Go Offline on the CRM toolbar if you chose Install Microsoft Dynamics CRM for Outlook with Offline Access (Advanced) when you were installing CRM for Outlook. Anything you change while in Offline mode will be stored so that when you go back online by clicking the Go Online button on the CRM toolbar, all the changes that were made while offline will be put into CRM.
Category List

Filter by Author
Adam Murchison
Alfwyn Jordan
Arthur Mandisodza
Calum Jacobs
Colin Maitland
David Mochrie
Dominic Liu
Gayan Perera
Harshani Perera
Isaac Stephens
Jaime Smith
Jared Johnson
John Barrencechea
John Eccles
Lauren Withers
Paul Nieuwelaar
Roshan Mehta
Roz Millar
Ryan Blaikie
Ryan Ingram
Sarah Coleman
Sean Roque
Shalane Williams