

Dynamics CRM 4.0 – Desktop Shortcuts
Nathan Eccles, 07 May 2010
If you’re a user which is frequently saving new records into CRM, this trick could help to save you time and effort. In this blog I will explain how to create desktop shortcuts which link to creating new records in Dynamics CRM.
If Internet Explorer is your Default Browser
Most businesses set Internet Explorer as their default browser, and considering Dynamics CRM 4.0 is only compatible with Internet Explorer this works well. If this is the case for you please use the following 6 steps. If your default browser is NOT Internet Explorer please refer to the next section.
- Open your CRM in your web browser.
- Navigate to the entity for which you wish to create a desktop shortcut.
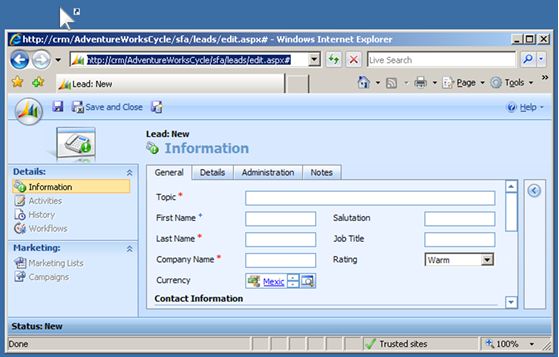
- Click the option to create a new record.
- Drag the small Internet Explorer icon located directly to the left of the URL (at the top of the window) onto your desktop.
If your CRM does not display a URL simply press “Ctrl + n” to open the same window in a regular browser window which does display the URL. - Rename the shortcuts if so desired.
- For multiple desktop shortcuts repeat steps 1-5 for as many entities as you require.
If Internet Explorer is NOT your Default Browser
If you are not using Internet Explorer as your default browser it becomes slightly more difficult to create working desktop shortcuts. However the following 10 steps should aid you in this process. If there is any confusion about this process please don’t hesitate to comment.
- Right click on your desktop and click New > Shortcut.
- Enter the following text "%ProgramFiles%\Internet Explorer\iexplore.exe" (or browse to find your Internet Explorer shortcut).
- Give the shortcut the name of the entity you are linking it to eg “New Lead”.
- Open CRM and navigate to the entity you wish to create the desktop shortcut for.
- Click the option to create a new record.
- Highlight and copy the URL (located at the top of the window).
If your CRM does not display a URL simply press “Ctrl + n” to open the same window in a regular browser window that does display the URL. - Right click the desktop shortcut created in Step 1-2 and click Properties.
- Click the end of the Target location (after the .exe”), put a space, and paste in the URL you copied in Step 6.

- Apply the settings.
- Repeat steps 1-9 for as many entities as you require.
Optional – Adding Icons to your Shortcuts
As you may notice if you create multiple desktop shortcuts, it can become difficult to distinguish between which shortcuts relates to which entities. By simply adding icons to each of the shortcuts you are able to make them clearly distinguishable.
To Add Icons to your CRM Desktop Shortcuts
- Right click the shortcut and click Properties.
- Click the “Change Icon...” button.
- Click “Browse...”
- Browse to the location of the file you wish to display as the shortcut icon.
- Select the appropriate icon file and click “Open”
- Click “OK” twice.
- Repeat steps 1-6 for all shortcuts you wish to put icons on.
Our amazing graphical designer David has offered to create high quality icons for all the main entities. These will be available for download in one of his later posts.
Category List

Filter by Author
Adam Murchison
Alfwyn Jordan
Arthur Mandisodza
Calum Jacobs
Colin Maitland
David Mochrie
Dominic Liu
Gayan Perera
Harshani Perera
Isaac Stephens
Jaime Smith
Jared Johnson
John Barrencechea
John Eccles
Lauren Withers
Paul Nieuwelaar
Roshan Mehta
Roz Millar
Ryan Blaikie
Ryan Ingram
Sarah Coleman
Sean Roque
Shalane Williams