

Auto Updating Reflections in Photoshop
David Sutton, 31 May 2010
One thing that I have always struggled with when making icons of CRM is making slick, nice looking reflections. After researching the problem on the internet and finding out what I already knew I was at a loss. However I started using smart objects to combine all my icons into one unflattened image and out of nowhere I made the discovery of auto updating reflections.
 Firstly when making the icons generally I use a template that means I only need to make the icon and reflection and I don’t need to fool around making shadows and other shapes.
Want to know how to create custom icons for CRM? Click here
When starting the icon all you need to do is create a new layer, to convert that layer to a smart object  you simply right click on the layer in the layer palette and click on ‘convert to smart object’ or you can go up to ‘layer>smart objects>convert to smart object’. Once you have done that a small symbol will appear in the corner of the layer preview box indicating that it is a smart object.
To open up the smart object what you have to do is to double click on the thumbnail, from this a warning message will come up, this is only to tell you that the smart object needs to be saved before changes appear on the main image – click ‘ok’. When the object is open it will appear in a new window or tab.

 You then need to design the icon taking into account the size compared to the main image. Once you have done that all you need to do is save and close the tab that you are currently working on. You will then be taken back to the main image where the design will be placed as a single layer.
(To open up the smart layer again double click on the thumbnail)
To create the reflection what you have to do is duplicate (layer>duplicate) the smart object. Once you have duplicated this you have to flip it vertically (ctrl+T then right click and select ‘Flip Vertical’)
Once that has been done you then need to move the flipped image to just below the original design. Select the move tool (V) and then while holding ‘shift’ drag the layer down below as this will be the beginning of the reflection.
 All that needs to be done now is to create a layer mask with a black to white gradient over the flipped layer. To do this select the flipped layer and press the layer mask button at the bottom of the layers panel. Select the layer mask and then drag a gradient over the area where the flipped layer is.
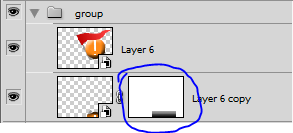 (The layer mask gradient has to go from black at the bottom to white towards the top.)
Once this is finished you should end up with an icon with a updatable reflection.
To show you why I said that this reflection is updatable you need to make a change inside of the original smart object.
NOTE: when making the changes you have to keep the position the same or you may need to redo the reflection, so it is advised that you make small changes e.g. changes to colour.
As an example I have written the word reflection and then changed it to reflect without editing the reflection itself.


Category List

Filter by Author
Adam Murchison
Alfwyn Jordan
Arthur Mandisodza
Calum Jacobs
Colin Maitland
David Mochrie
Dominic Liu
Gayan Perera
Harshani Perera
Isaac Stephens
Jaime Smith
Jared Johnson
John Barrencechea
John Eccles
Lauren Withers
Paul Nieuwelaar
Roshan Mehta
Roz Millar
Ryan Blaikie
Ryan Ingram
Sarah Coleman
Sean Roque
Shalane Williams