How to format a Date/Time field in a Microsoft Dynamics CRM Mail Merge Template to exclude the Time.
Colin Maitland, 05 February 2014
In this blog I will describe how to format a Date/Time field in a Microsoft Dynamics CRM Mail Merge Template so that the time portion is excluded; for example to display 24/1/2014 instead of 24/1/2014 12:00 a.m.
The following image shows an example of a Donation record Date/Time field named Donation Date on a custom Mail Merge enabled entity named Donation. The display format for the Donation Date field is set to Date Only and so the Donation Date is displayed as a Date Only rather than a Date and Time when viewed on Forms and Views in Microsoft Dynamics CRM.

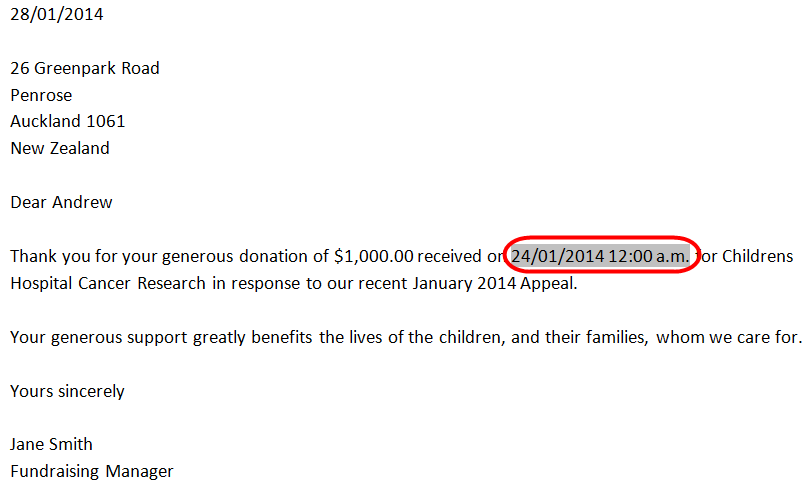
However, when the Donation Date is added as a merge field to a Microsoft Word Mail Merge Template both the Date and a Time portion are displayed as shown in the following image:

The following steps show how to format a Date/Time merge field in Microsoft Word so that only the Date portion is displayed.
1. When editing the Mail Merge Template in Microsoft Word, at either the Write Your Letter or the Preview Your Letters steps in the Mail Merge Wizard, right-click on the Date/Time merge field and then select Toggle Field Codes from the list of options listed in the popup menu.

• Or select Toggle Field Codes at the Preview Your Letters step:

2. The merge field should now be displayed in the following manner:
![]()
3. Edit the Merge Field as follows:
• e.g. Insert the following formatting information: \@ “dd/MM/yyyy” to format the date as shown in the images below. Note: Take care to include the double-quotes and take care not to delete the braces { } surrounding the merge field.
![]()
![]()
• Right-clicking the merge field selecting Toggle Field Codes will enable you to switch the between the write letter/preview letter and field code formats so that you can check the impact of the formatting information you have added.
• The following are examples some date formats:
\@ “dd-MM-yy” 24-01-2014
\@ “dd/MM/yyyy” 24/01/2014
\@ “dd MMM yyyy” 24 Jan 2014
\@ “dd MMMM yyyy” 24 January 2014
\@ “dddd dd MMMM yyyy” Friday 24 January 2014
\@ “dddd, MMMM dd, yyyy” Friday, 24 January, 2014
4. Advance the Mail Merge Wizard to the Complete the Merge step and then click Upload Template to CRM from the list of options displayed.


5. Select Yes at the following prompt:

6. Switch to the Mail Merge Template form that is now opened in Microsoft Dynamics CRM and select either Save or Save & Close.

7. Switch back to the Mail Merge Template document in Microsoft Word.
8. Optionally complete the Mail Merge by selecting either Print… from the Complete the Merge pane of the Mail Merge Wizard or by selecting Finish and Merge and then Print Documents from the Mailings Tab of the Microsoft Word Ribbon Bar.


9. When finished select File, Close to close Microsoft Word.
10. When prompted select OK at the following prompt.

11. When prompted select Don’t Save at the following prompt. Note: You don’t need to save the Mail Merge Template because it has been uploaded to Microsoft Dynamics CRM.


