Splitting large Spreadsheets into smaller files for data migrations
Ahmed Anwar, 16 October 2014
Dynamics CRM only accepts files up to 8MB. We can change this limit using an unsupported technique, however with Dynamics CRM Online we cannot do this.
So, the only way to import large datasets is to either manually break that large file into smaller files by copying, pasting and saving new files or we can run a VBA code in Excel to do it for us.
The code execution has to be done on the large file that exceeds the 8MB limit. It will generate the necessary files according to the number of rows defined in the RowsInFile variable.
For example, if you want each file to contain 4000 rows, then replace the 1000 to 4000 in the following code.
Sub Test()
Dim wb As Workbook
Dim ThisSheet As Worksheet
Dim NumOfColumns As Integer
Dim RangeToCopy As Range
Dim RangeOfHeader As Range 'data (range) of header row
Dim WorkbookCounter As Integer
Dim RowsInFile 'how many rows (incl. header) in new files?
Application.ScreenUpdating = False
'Initialize data
Set ThisSheet = ThisWorkbook.ActiveSheet
NumOfColumns = ThisSheet.UsedRange.Columns.Count
WorkbookCounter = 1
RowsInFile = 1000 'as your example, just 1000 rows per file
'Copy the data of the first row (header)
Set RangeOfHeader = ThisSheet.Range(ThisSheet.Cells(1, 1), ThisSheet.Cells(1, NumOfColumns))
For p = 2 To ThisSheet.UsedRange.Rows.Count Step RowsInFile - 1
Set wb = Workbooks.Add
'Paste the header row in new file
RangeOfHeader.Copy wb.Sheets(1).Range("A1")
'Paste the chunk of rows for this file
Set RangeToCopy = ThisSheet.Range(ThisSheet.Cells(p, 1), ThisSheet.Cells(p + RowsInFile - 2, NumOfColumns))
RangeToCopy.Copy wb.Sheets(1).Range("A2")
'Save the new workbook, and close it
wb.SaveAs ThisWorkbook.Path & "\file " & WorkbookCounter
wb.Close
'Increment file counter
WorkbookCounter = WorkbookCounter + 1
Next p
Application.ScreenUpdating = True
Set wb = Nothing
End Sub
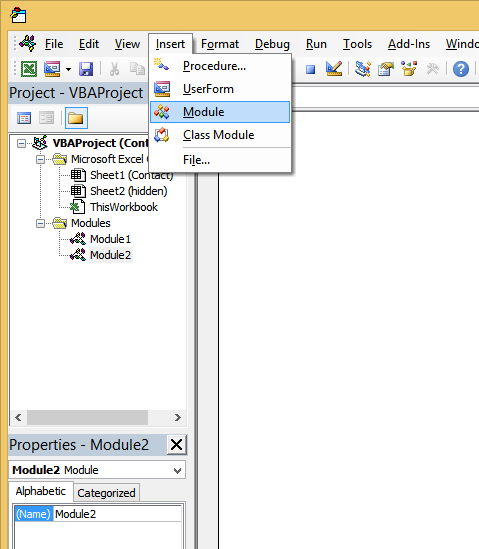
1. Copy the above code and press ALT+F11, this will show a new window
2. In the main menu
a. Go to Insert and click Module

b. Paste your code
c. Then run the code by pressing F5
The files will be created in the same directory as the current spreadsheet. Another handy tip, rather than importing all files individually, select all the generated files and compress, then upload the compressed zip file.

