Set Personal Options for Dynamics CRM 2011 Outlook Client
Paul Nieuwelaar, 10 November 2011
In my last post I described the steps to set up your Dynamics CRM 2011 Outlook Client for Office 2007 and 2010. In this blog post I will go through the steps to configure your Personal CRM Options for Office 2007 and 2010.
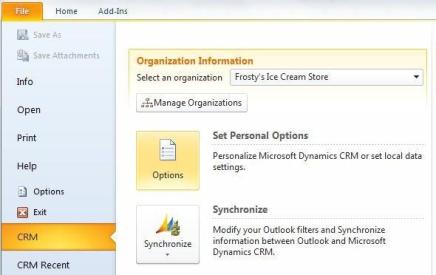
1. If you are using Office 2010, to configure your personal CRM settings, click on the File menu within Outlook, select CRM and then click Options.
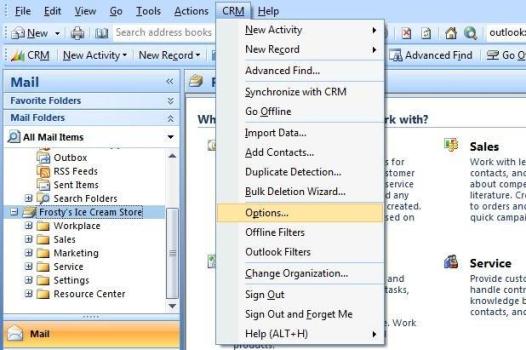
2. If you are using Office 2007, click on the CRM menu, and select Options… from the drop down menu.
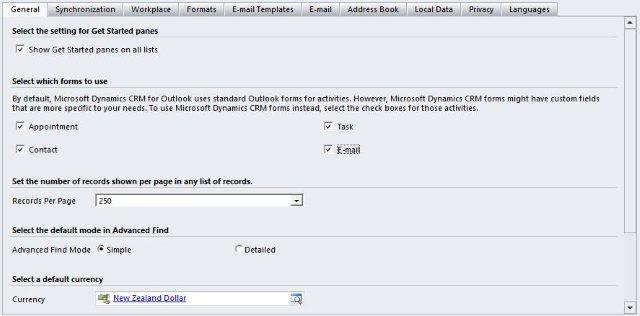
Note: The images for each section represent my recommended settings, however these can be modified to suit your own requirements.
3. General Tab:
Tick the Appointment, Task, Contact, and E-mail boxes near the top. This will mean when activities from CRM are opened in Outlook, the CRM forms will be displayed instead of the Outlook forms. You can also set the number of records shown in views (up to 250), and also whether advanced finds will show the simple or detailed view by default.
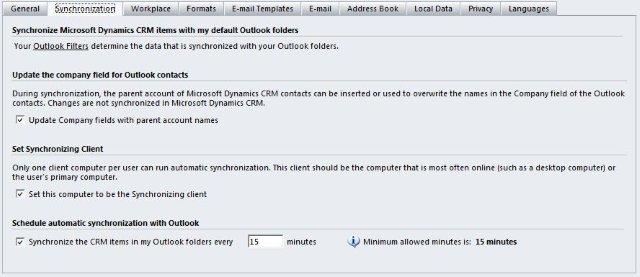
4. Synchronization Tab
Tick all 3 boxes, which will set your computer as the synchronizing client. If you install the CRM Outlook Client on multiple computers only one can be the synchronizing client. You can also change the synchronization period between Outlook and CRM.
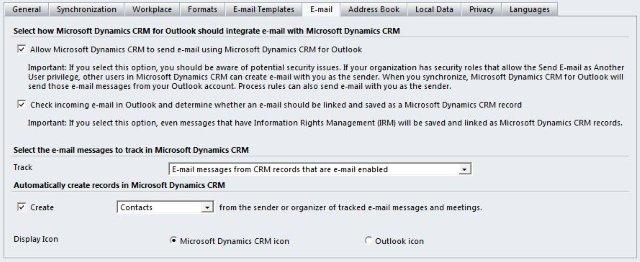
5. E-mail Tab
Tick the first box, which will allow emails you send from CRM to be sent through Outlook, and the second box which will automatically track emails in your inbox based on the tracking option below. Using the ‘Track’ drop down, you can specify that all email messages are tracked in CRM, or only messages that are from CRM Contacts etc.
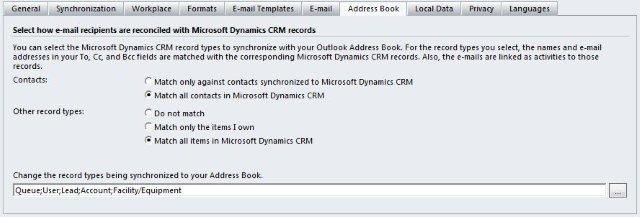
6. Address Book Tab
Select the bottom radio button for each group to synchronize all Contacts, Accounts, or Leads in CRM with your Outlook address book. At the bottom, you can specify the record types from CRM that you want synchronized with your Outlook address book.
7. Local Data Tab
If you are using (planning to use) the Offline Capability with CRM, you can select both check boxes, which will update your local data periodically to speed up going offline. You can also enable duplicate detection when synchronizing from offline to online mode.

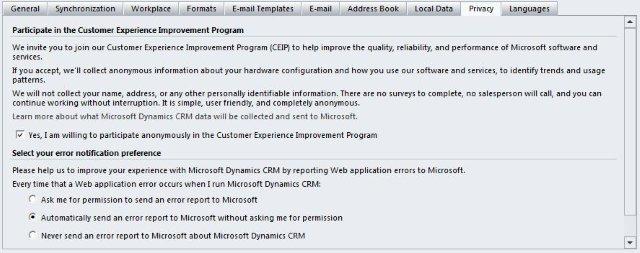
8. Privacy Tab
To help Microsoft improve quality and performance, you can tick the Check box, and select the middle radio button to automatically send error reports. This will automatically send your experiences and errors with CRM to Microsoft.
9. The Language settings will be set to your default organizations language, which you shouldn’t need to change. You can click Ok to save and close the personal options.
10. You may need to restart outlook for the changes to take effect.
These settings can be changed at any time, so if you ever want to change your settings again you can follow these steps to modify them. Please leave a comment below if you have any questions about Personal Options.

