

Show a Tab Based on a Radio Button Dynamics CRM 2011
Paul Nieuwelaar, 28 June 2011
In one of my previous posts, I showed how to dynamically Show a field in Dynamics CRM 2011 when ‘Other’ is selected from an optionset. To achieve this I created a simple JScript function called ‘showField’. This function could be used anywhere in the system to display or hide a field based on the selection of an optionset or radio button.
This ‘showField’ function was just one of many time-saving functions I have created for Dynamics CRM 2011. I thought I would share some of these functions to save you reinventing the wheel, starting with my ‘showTab’ function.
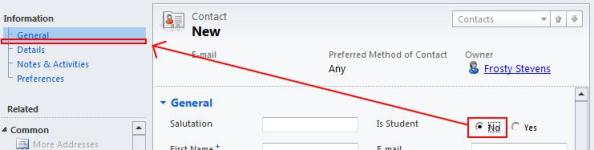
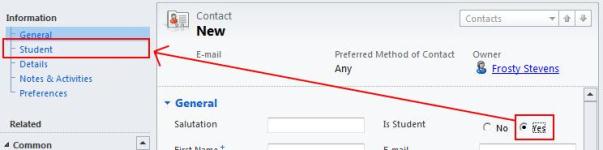
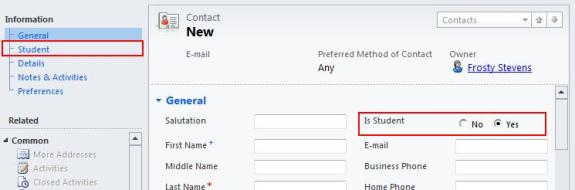
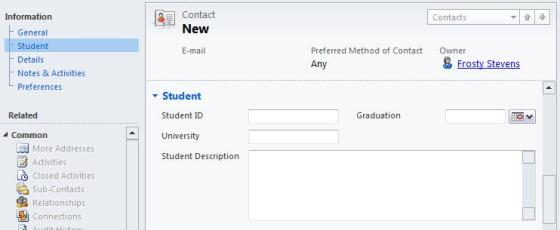
Like the ‘showField’ function the ‘showTab’ function is called when an option is selected from an option set or radio button. However instead of hiding/showing a field this will hide/show a tab. In this example I will be creating a new tab on the contact called ‘Student’, and a new radio button called ‘Is Student’. If this radio button is set to ‘yes’ the Student tab will be displayed, otherwise it will be hidden. This means only contacts that are set to be ‘Students’ will see the Students tab, therefore you won’t need to worry about this tab for any other contact types.
To get this working all you need to do is create a new Web Resource from the Customizations area, with a name of ‘showTab’, and with the type set to ‘JScript’. After saving the Web Resource, click on the ‘Text Editor’ button, and then paste in the following code:
function showTab(tabNumber, optionField, optionValue) {
if (Xrm.Page.getAttribute(optionField).getValue() == optionValue) {
Xrm.Page.ui.tabs.get(tabNumber).setVisible(true);
}
else {
Xrm.Page.ui.tabs.get(tabNumber).setVisible(false);
}
}
That’s all you need to set for this, you can now Save and Close the Web Resource. Next you will need to open the Form, to call this function from the ‘Is Student’ onChange, and from the Forms onLoad events.
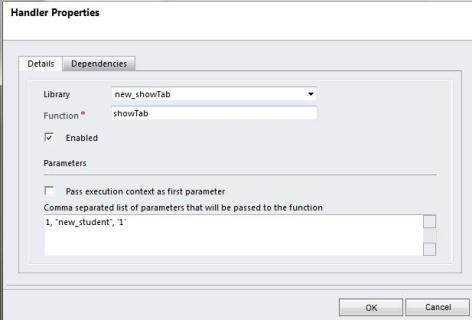
To add the JScript library to the form, click Form Properties, and then click ‘Add’ under Form Libraries of the Events tab. Select the showTab web resource, and click ok. Next scroll down to Event Handlers, and click ‘Add’. Select the showTab library, and then enter the function name (‘showTab’ in this case). In the parameters text box enter the following line:
1, "new_student", '1'
Where the first 1 is the tab number you want hidden (the first tab on the form is ‘0’, then ‘1’ and so on). “new_student” is the name of the optionset or radio button field (this is the ‘Is Student’ field). Finally the second ‘1’ is the value of the option selected (for example with an optionset this will be something like ‘100000000’. However with radio buttons this is simply ‘1’ for yes, and ‘0’ for no).
Once you have set the properties for the onLoad, click ok, and then select the ‘Is Student’ field, and click ‘Change Properties’. Add a new Event Handler from the Events tab just like before, setting: 1, "new_student", '1' in the parameters list. This should look exactly like the onLoad event handler.
Finally click Ok to close the field properties, and then test that it is working by previewing the create form.
Note: You will need to publish the showTab web resource before it will work.
This function can be used multiple times on the same optionset to hide multiple tabs at once if desired. All you would need to do is change the tab number from the new parameters list.
And the final result:
Category List

Filter by Author
Adam Murchison
Alfwyn Jordan
Arthur Mandisodza
Calum Jacobs
Colin Maitland
David Mochrie
Dominic Liu
Gayan Perera
Harshani Perera
Isaac Stephens
Jaime Smith
Jared Johnson
John Barrencechea
John Eccles
Lauren Withers
Paul Nieuwelaar
Roshan Mehta
Roz Millar
Ryan Blaikie
Ryan Ingram
Sarah Coleman
Sean Roque
Shalane Williams